Hi, welcome back again. Thanks for taking a peek.
Today I'm going to talk about bench work. In an
earlier post I decided on a 4X8 layout. Though me reasons were valid, I have to admit, I already had a 4X8 foam based layout planned and the bench work completed in the garage.
Deciding to move it into the sun room required some rebuild and I'm going to walk through a bit about bench work for stand alone tables. But some of the technique here will be valid for layouts around the room.
I plan on the layout being mobile at some time and want to be able to move it with little to no fuss.
So it must be stable, no matter what I'm doing to it, and it must be light enough to slide easily, and to be picked up.
So let talk about stability. I see there being 4 different aspects to stability to think about. In a post at NScale.net I detailed 3, but in thought I missed on.
1) Vertical Stability - Can it handle the weight of the layout without issue. Typically we build layout bench work so strong you could drive a car across it with no problem.
2) Lateral Stability - Can it be pushed and pulled, front to back, side to side without dislodging trains, or collapsing. This one is harder and usually if you're not anchored to a wall, most layouts suffer from inadequate stability.
3) Twist or Warp - This one is often over looked but for me it's critical. If i pick up one corner of my layout it can't warp. If it does it's going to pop all kinds of rock work off.
4) Does it stay put? - This is one i talked about in the post, but didn't think about adding it as a stability factor. If you lean on your layout will it stay put reasonably. At the same time, can you with modest effort move it for cleaning.
So here's a shot of the bench work completed and ready to start into track.

(NOTE: I CAN NOT GET CORNERS OR ANGLES RIGHT FOR THE LIFE OF ME. ALSO, please keep in mind that this is a salvaged table and there's all kinds of holes in it from other usage. I will patch before I paint when the time comes.)
So with this bench work as seen, i can pick up the layout with one hand. (Ok the balancing act is interesting to watch. But it is light enough to do so, and it's stable enough to climb on, and won't twist if my helper and I don't stay in synch as we stand it on end or on it's side.
Table
The table top is pretty simple 1X4 construction with 1X4 stringers and a 3/8 sheet of ply wood over the top. For the original layout that was all that was necessary as all elevation was going to be using foam. The plywood was enough to keep it square. I've decided to use a "cookie cutter" style this time around and need to brace the corners.

For this I used left over 1X4. Another option would be to brace with 1X2 but bring it away from the corner some.
Legs
For legs I used 1X3 and glue into an "L" shape. This will give you darn near the strength of 4X4s with less weight that 2X4s. Shown here just sitting in position. Attach with glue and screws. (Pre drill the holes for the screws as 1X anything tends to split.)

I attach using 2 bolts and glue. The bolts will be good if you are anchored to a wall, but the glue is necessary to for a really solid attachment and is critical to the lateral stability. Bolts alone will not hold the leg firm.
 Bracing
To complete the bracing for side to side stability I used 1X4 near the floor. Also bolted and glued. By the time glue drys I've got a very solid foundation that will not move left to right.
Seen here with a deck for boxes already in place.

For bracing front to back, I use 1/2 conduit pipe with ends flattened and drilled. For my layout I'm very concerned about bracing this direction as I'm going to spend lot of time moving it into and away from the wall.

My really big concern is about warping when picking up a corner or trying to move the layout out and to a show.
If I pick up a corner of a layout it will normally warp, and the legs will split apart corner to corner. To keep the legs in relative position I use a cross over with wire and turn buckles. This could also be accomplished via corner to corner cross pieces using 1X4 as well.


The turn buckle arrangement works by applying pressure to keep the legs from moving away from each other. But you need to alternate tightening the turn buckles or you will induce a warp by pulling them into each other.
Moving
One of the goals I have is the ability to move the layout without much effort. I use
Magic Sliders on the bottom of the legs. They allow me to slide the layout well, but not so easy as to have trouble keeping in place when leaning against it. Wheels are another option, but I find that they do tend to allow it to move too easy.
With the layout as it is now can still move it around with 1 or 2 fingers, but it won't move by a casual brush up or leaning on it lightly.
Levelling
To level the layout I use a screw in leveller. You can get them at HD or Lowes, and Shepard Slide Slide Glide( Magic Sliders make one as well. )
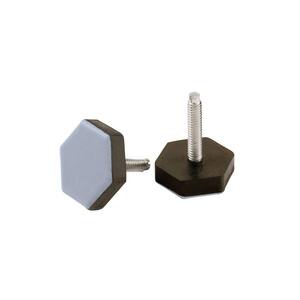
Because I have the 1X3 L shape legs I have to cut a 2X2 about 4" long, drill the bottom and attach to
(Note: not an issue on this layout as I know the floor is flat. If I move it somewhere else I'll install the levellers.)


